This recipe for pork belly burnt ends is an absolute crowd pleaser! Made from the same cut of meat bacon comes from, these are the perfect blend of sweet, savory and tangy. My customers can’t get enough of them!
What you need:
Slab of pork belly
2 Cups of your favorite dry rub
1 Cube of butter
1 Cup Brown Sugar
½ cup Honey
BBQ Sauce
Apple Cider Vinegar
Cutting Board
Large Mixing Bowl
Finished pork belly burnt ends- Ready to be enjoyed!
Directions:
If your pork belly still has the skin on, trim
this first. Then cut slab of pork belly into 1-2” cubes. I prefer to cut the
slab into strips first, and then cut the strips into cubes. Dump the cubes into
a large bowl.
Apply dry rub to cubes and mix.
Optional: I use a technique where I add the rub
(About 2 cups for 11lbs of pork belly), and then mix by pulling from the
bottom. You can see this in my video.
Spread rubbed pork belly cubes on the grates of
your smoker.
Optional: I prefer to use a weber grilling rack (Like
this one) for convenience and safety (Excess oxygen exposure can lead to a VERY
HOT smoker.)
Smoke uncovered at 250-275 for 2-2.5 hours
Remove from smoker and place cubes in a foil
tray.
Add brown sugar, butter and honey and cover with
heavy duty foil.
Place in smoker for another 2 hours.
Mix your finishing glaze: ½ cup Apple Cider
Vinegar and ½ cup BBQ sauce
Note: This can be adjusted to taste. Try ¼ cup
ACV and ¾ cup BBQ sauce.
Remove pork belly cubes from smoker and drain
the juice from the tray.
Optional: Reserve some of the juice for the
glaze.
Pour finishing glaze over pork belly in tray and
mix.
Smoke uncovered another 10 minutes to let the
glaze set.
Enjoy! Try and leave some for your guests.
Note: These make some AMAZING sandwiches. Top
with a little coleslaw and a dash of your rub. Heaven.
Ever since I got good at barbecue, the idea of smoked desserts appealed to me. I think they’re unique, and really show off your skills.
I see lots of people do cobblers and cakes, but quickly realized no one ever talks about my favorite dessert- ice cream! Well then, challenge accepted!
Looking over the ingredients for ice cream, and trying to figure what would take on smoke the best, I opted to try smoking the cream as it seemed it would be the easiest ingredient to take on smoke. Plus, I could smoke a big batch of it, and experiment with ratios and flavors and what not.
The first challenge was figuring out how to keep the cream at a low temperature to prevent bacteria growth while running a smoker that will exceed 200 degrees.
My idea was to take a smaller pan and cast it in ice inside a larger pan. The thought was the ice would take a little more time to melt, and keep the cream at a safe enough temperature to prevent bacteria growth.
The inner pan down and filled the outer pan with water.
The pan encased in solid ice
Once the ice was solid, I added my cream and set in the smoker. I added a probe so I could monitor the temperature.
The haze in the background is the smoke rolling.
I hit it with a mix of pecan and apple wood ad set it directly above my water pan, which normally runs cooler. It took about 20 minutes for the ice to melt and the cream to raise up to about 60 degrees. Good enough, lets see what happens!
The smoked cream tasted rather bitter. I believe my mistake was hitting it with TOO much smoke. Next time I’ll be sure to back it down a bit more.
I proceeded to make the first batch, a vanilla mint flavor, and used a mostly 50/50 split of smoked cream and regular cream. Sweet is one way to offset bitter, so my thought was the regular cream, combined with the milk and other ingredients would help temper the bitterness a bit, and it did- but not enough for my liking. My girlfriend, on the other hand, really seemed to enjoy it.
The next day, I decided to make a mocha flavor, only this time I used 1/2 cup smoked cream and 1 1/2 cup regular cream. This was further diluted with 1 cup of milk. The final product was much better, but still a little too bitter for me.
HOWEVER: something magical happened the following day.
I was prepared to throw both batches out and start over, but decided to give each of them one more taste. Oh my god were they amazing!
The vanilla mint didn’t hit nearly as hard, and gave you a bit of smoke flavor on the back end, which really complimented the vanilla and peppermint flavors. I personally feel it’s still TOO much, but it’s not as overpowering or bitter as the first round.
The mocha did the same thing- giving you a great smoke flavor that paired really well with the chocolate and coffee in the ice cream. Since I used a lower ratio of smoked:regular cream, this was much more palatable
I still need to refine the technique a little, and go lighter with the smoke. I also need to figure out a better ratio of smoked cream to ingredients for the final product.
Other observations: I think part of the reason I tasted so much smokiness is because I was in it for so long. When you do any kind of BBQ, you get smoke in your clothes, on your skin, in your hair… you smell it for days. Since your sense of smell is tied directly to your sense of taste, it boosts the flavor. I think this helps explain the differences in flavor experienced between my girlfriend and I.
Anyway, there it is.. My first dabble with smoked ice cream. They can’t all be winners, and there is some good learning opportunities here. I have more experimenting to do, so stay tuned!
On most recipe sites, this is the spot where you’d get some self important story about how the dish inspired someone to climb Everest or how it led to social change within their community, or how it just wrapped their entire family in a hug, while they cuddled and sang songs around a campfire.
These recipe sites piss me off, so I’m not going to do that. Here’s the recipe for the most amazing smoked mac and cheese recipe you’ll ever make.
Smoked no boil mac and cheese:
Ingredients:
1 9×13 pan
1 stick of butter, melted
12-16 oz of your favorite noodles. I use rotini because it’s fun to say. Use what you like.
8 oz sour cream
1 tablespoon yellow mustard
1 tablespoon chili powder
1 teaspoon salt
1 tablespoon garlic powder
1 tablespoon Worcestershire sauce
24 oz of cheese or your choice. For me it varies based on what I’m in the mood for. I will generally do 8 oz cheddar blend, 8 oz sharp cheddar, and 8 oz monterey jack or mozarella.
1 quart milk
2 tbsp paprika
Steps:
1) Preheat your smoker to run between 225 and 250.
2) Add the melted butter to your foil pan and spread along the sides and bottom. This will help keep the noodles from sticking to the sides.
3) Add noodles and stir with the butter.
4) Add sour cream and mix well, coating all noodles evenly
5) Add mustard, chili powder, salt, garlic powder and Worcestershire sauce, 16 oz of cheese, and milk and mix well.
6) Wrap in foil and set on your smoker for 90 minutes.
7) After 90 minutes, lift the foil and check the mac and cheese. You want to make sure most of the milk has been absorbed into the noodles. If most of the milk has been absorbed, move on to the next step. If not, re-cover and check back in 30 minutes.
8) Add the remaining 8 oz of cheese to the top.
9) Sprinkle the paprika over the top of the cheese
10) Close the smoker and allow to cook another 60 minutes. If needed, add a chunk of a nice, strong flavor wood, like hickory or mesquite, to your fire.
11) The end product should be a nice, darkened, gooey mess. Enjoy!
You made the mistake of cooking barbecue for other people, and now you’ve backed yourself into a corner, because the word is out about your legendary BBQ. It’s so good, your wife’s friends won’t stop talking about it. Their husbands won’t stop talking about it. Well, except for that one guy who thinks he can do anything you can do, but better. Doesn’t matter, no one likes him anyway, but I digress. Pretty soon everyone you know is asking you to cook for them and their event. One meal has now turned into a full summer’s worth of bookings. Just how in the world are you going to pull that off?
Fear not, local master of the barbecue pit! This guide will help you get started.
Logistics- A fancy way of working out the who, what, when, where, why and how
The key to ensuring any large operation is a success is in the planning, and cooking for a large group is no different. The devil, as they say, is in the details.
Who are you cooking for?
Who you’re cooking for is a big factor in determining how much food to buy. A group of guys will consume much more food than the local book club, so the demographics of your group matter.
What’s The Occasion?
Cooking for a group to watch the game will require more food than if you’re cooking for a birthday party. Also, if it’s a buffet, you’ll need to factor in extra food as people tend to over-serve themselves as opposed to a sit down style dinner.
Something else to consider- what side dishes are being provided? People won’t generally fill up on veggie platters and chips and dip like they would on potato salad and corn bread.
When Is The Event?
Events during the holidays lend themselves more to over-eating than events during random times of the year.
So.. We’ve got all the details worked out – How much meat per person do I need to buy?
It’s been said the way to a person’s heart is through their stomach. It’s also been said money can’t buy happiness, though I’d argue that person never strolled through the meat section of Costco.
Factoring in all of the above details, I like to use a simple formula for determining how much meat to buy:
¼ lbs uncooked meat per person for:
Any event involving a large amount of children or elderly guests.
Office cocktail party or work event where only hors d’oeuvres (Fancy way of saying “snacks”) are being served
Potlucks that will likely consist of other large, heavy dishes and sides.
½ lbs uncooked meat per person for:
Any family type of party or gathering that will have a mix of young and old guests and may only feature a few side dishes.
Lunch events
Sit down, family style dinners that are only slated to last a couple hours
NOTE: This is pretty much the standard when it comes to figuring out how much food to buy per person .If in doubt, default to this formula and you’ll be fine 80% of the time.80% of the time it works every time.
¾ lbs uncooked meat per person for:
Dinner parties planned to go more than just a couple hours.
Gameday!
Any family-style party where you might want leftovers
Buffets
1 lbs uncooked meat per person for:
Any event where the guests will be primarily guys will need more food. Teens, adult males = more food. It’s science.
Of course there are many other factors you might need to consider, but hopefully this guide gives you enough to get started.
Questions? Send an e-mail to backyardpitmasternet@gmail.com.
– Bacon- I prefer to use thick cut, but use whatever works for you
– Breakfast Sausage- About 1/2 lbs or so. It’s not an exact science, so your mileage may vary
– Peach Preserves
– Honey Pecan Cream Cheese
– Mini Muffin Tin
– Mini Muffin Liners
– Oil (Optional)
Steps:
1) Preheat your smoker to cook at 225.
2) Line the mini muffin tin with the liners.
3) Spray the liners with oil (Optional)
4) Cut your bacon in half.
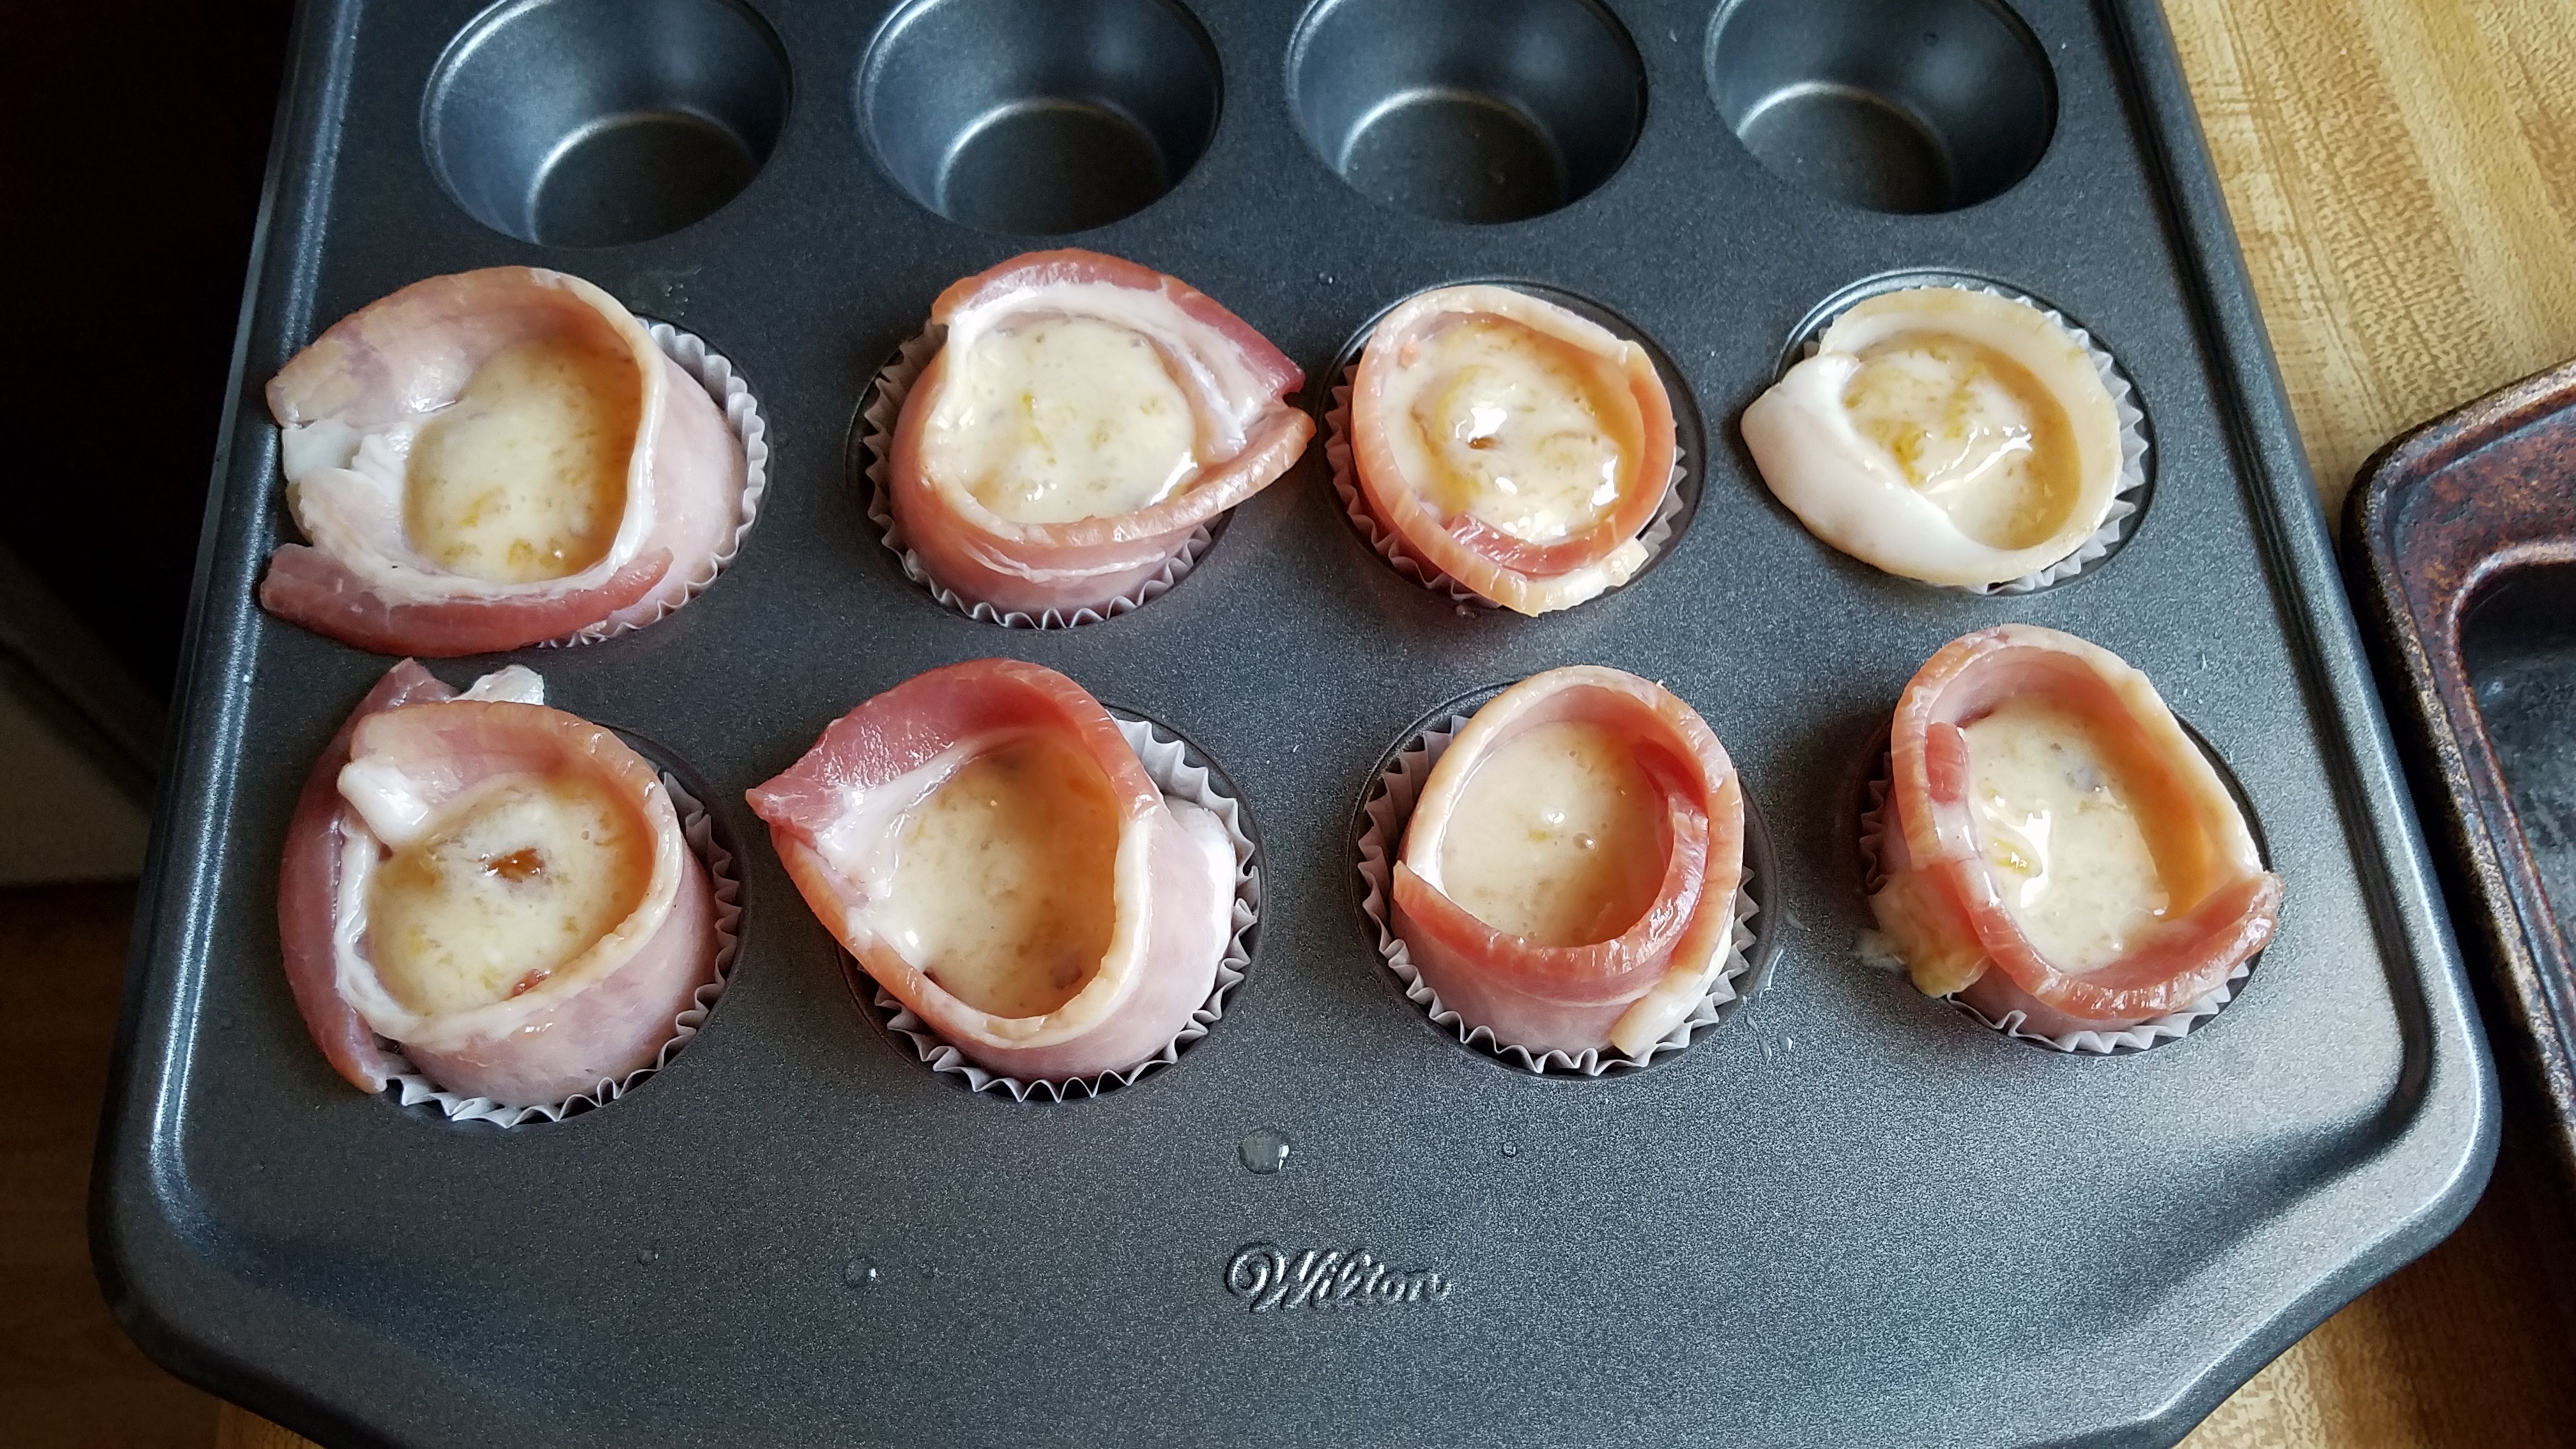
5) Take half a piece of bacon and wrap it around the outside of the mini muffin tin, forming a cup.
6) take a small clump of sausage and press it into the bottom of each cup. Press your finger into the middle to give it a small indent:
7) Mix your peach preserves and cream cheese into a bowl. I recommend playing with the mixture until you get a flavr you like. My personal preference is to go 2:1 Peach Preserves to cream cheese, but I recommend starting with equal parts until you get your flavor:
8) Fill each of the cups to the brim with the peach preserve/cream cheese mixture:
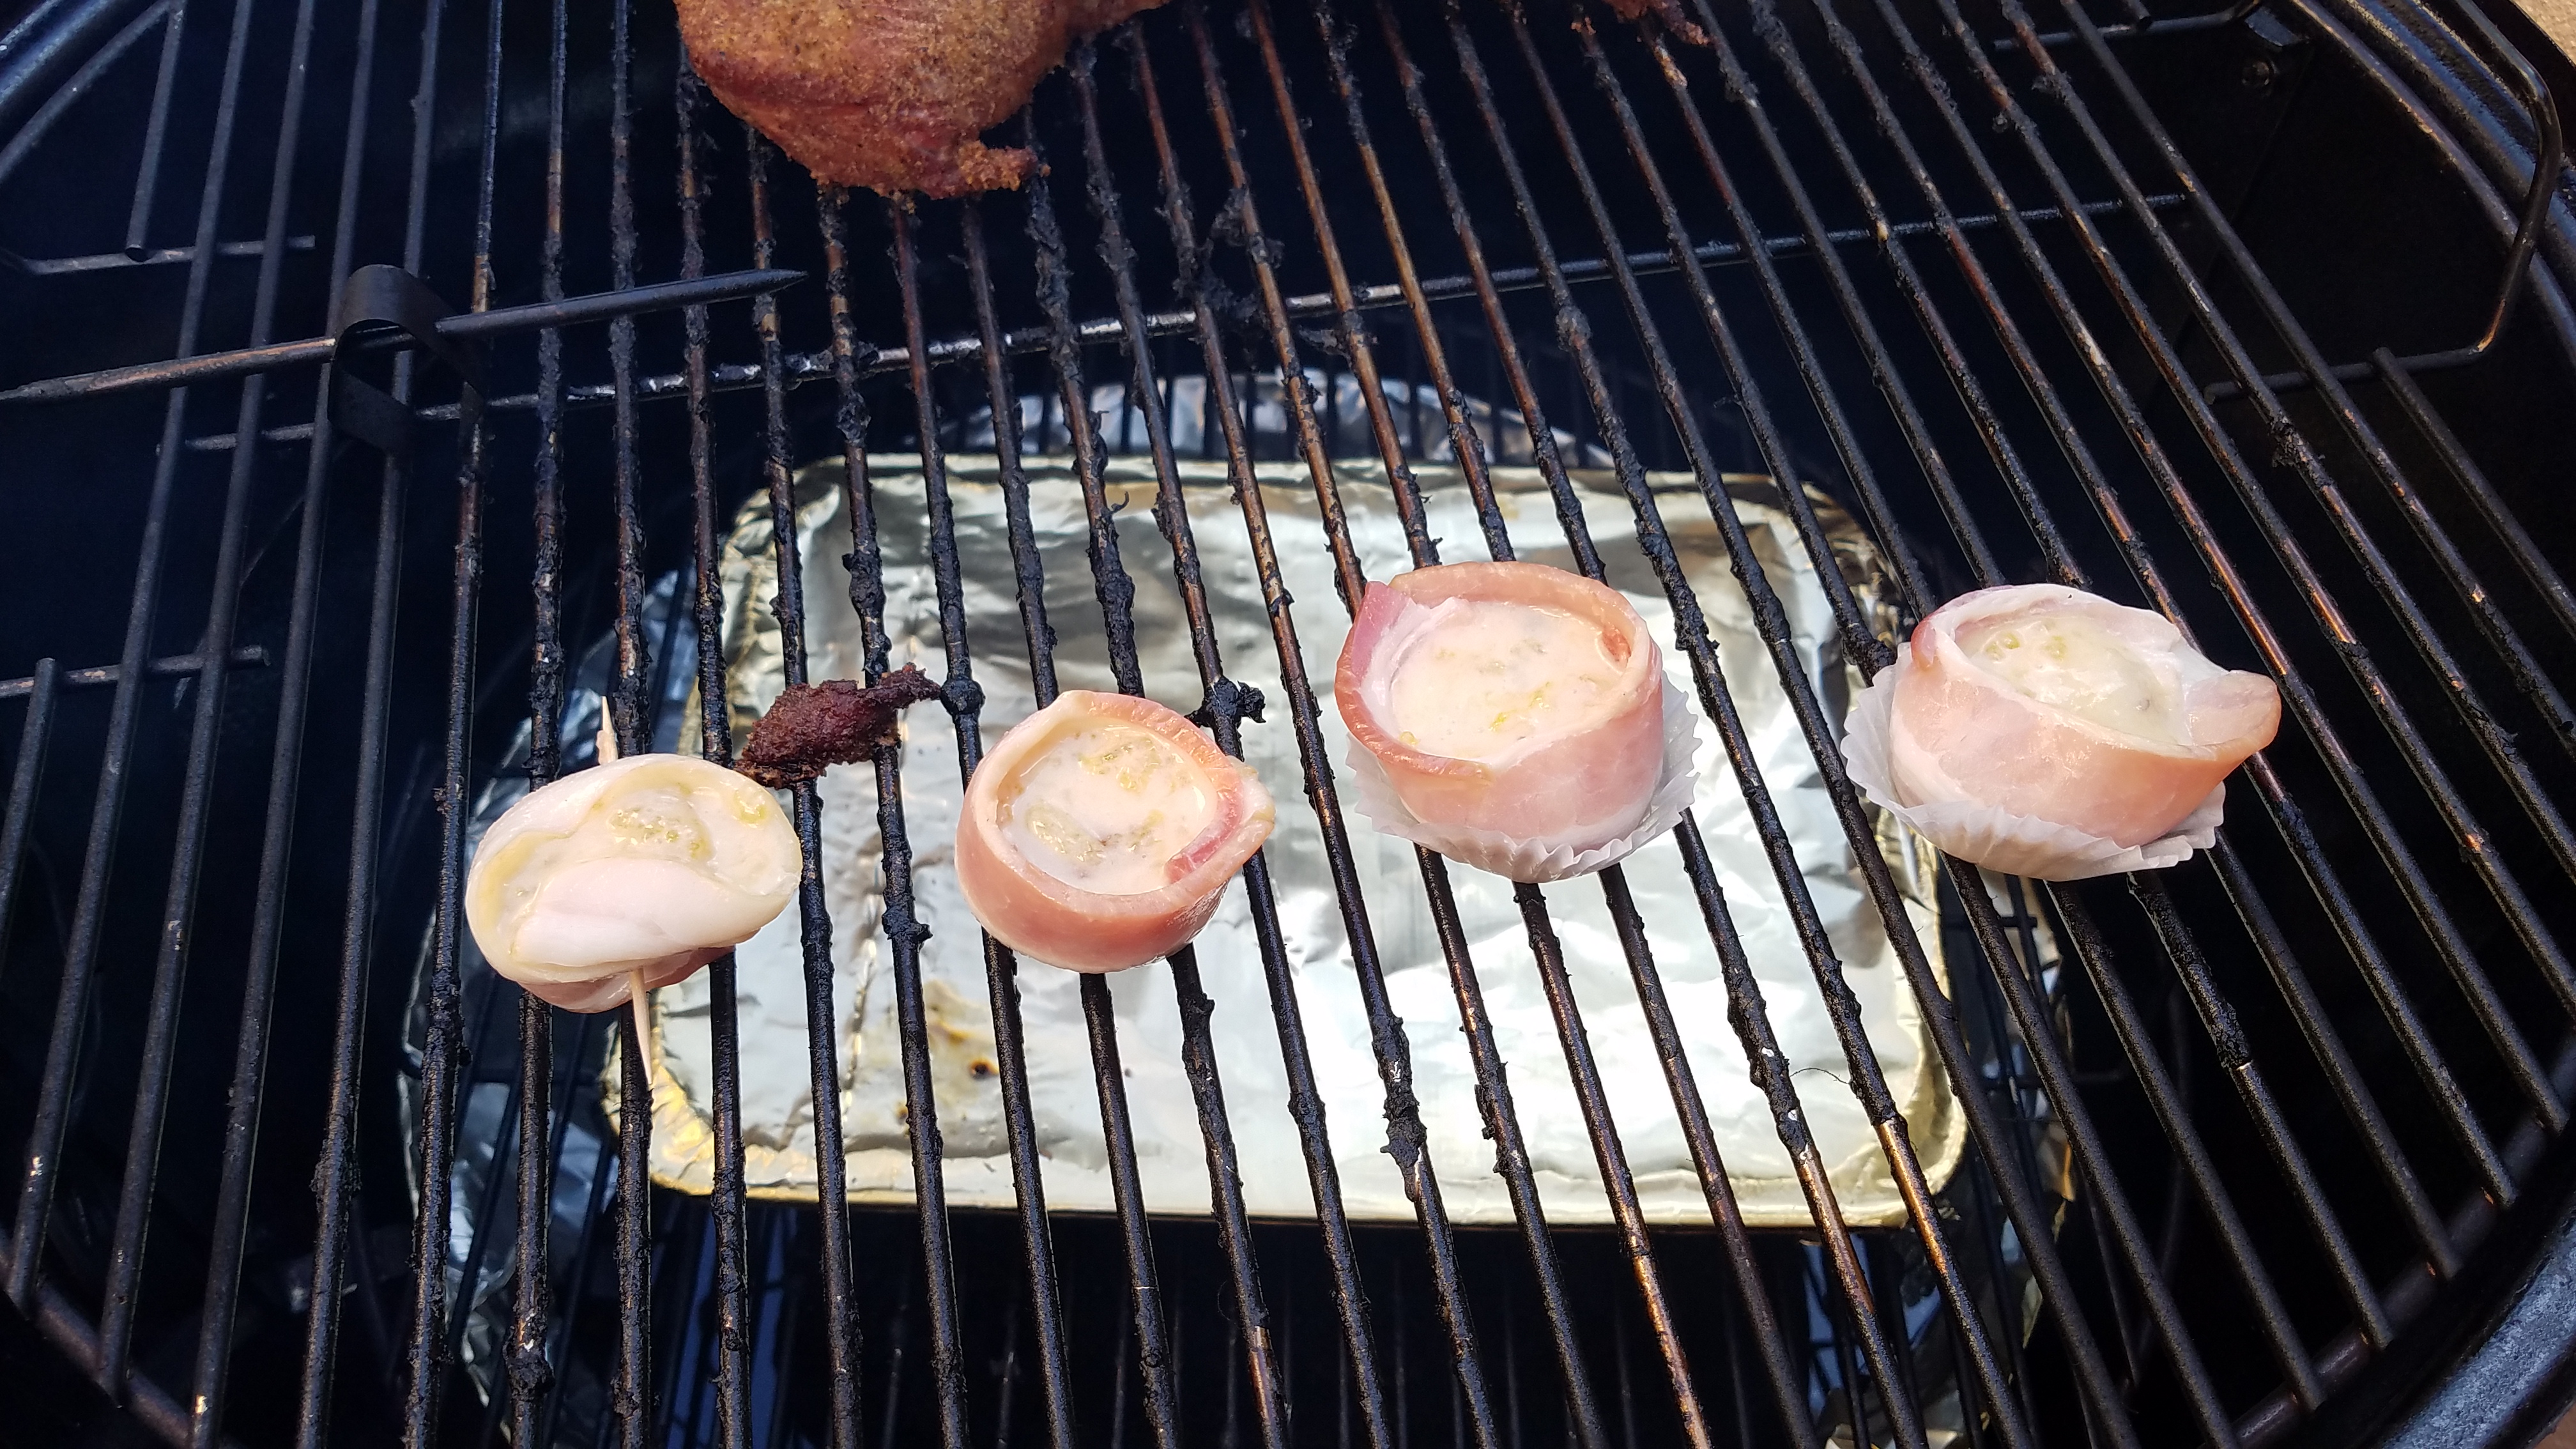
9) Place on your smoker and cook at 225 until the bacon is done. This takes about an hour or so:
They’re done when the bacon is cooked thoroughly:
Enjoy!
Questions/Comments about this Suggestions for improving this recipe? Shoot me an e-mail- backyardpitmasternet@gmail.com
Don’t forget to sign up for my mailing list for more recipes like this one!
For many new backyard pitmasters, whether or not to cook with a pan full of water in their smoker is often a source for great debate. The truth is, there are a variety of options that can be used to create the indirect cooking surface needed for low and slow BBQ, and using a water pan is just simply one of them. However, as with all things BBQ, the right way to go is really just a matter of personal preference.
Is using a water pan in your smoker really necessary?
If you’re looking for reasons to use a water pan in your smoker, there are essentially four:
Water creates an indirect cooking surface:
Cooking over indirect heat is essential to making really good BBQ. In some smokers, notably offset smokers, such as those made by Char Broil that you find in the big box stores, the heat source is located off to the side, away from the cooking chamber. This design creates a natural source of indirect cooking without the need for additional modifications.
In popular bullet or cabinet style smokers, such as the Weber Smokey Mountain, or even homemade drum smokers, the heat source is located on the bottom, directly below the food. With this setup, some kind of heat deflection is required for slow and low cooking.
Water aids in temperature control:
As a means for temperature control, water works the best for maintaining lower temperatures. This is because of a process known as evaporative cooling (YAY science!). As the water heats up and approaches boiling, it begins to evaporate, putting water vapor (A fancy term for “Steam”) into the air. Since the water temperature won’t ever exceed 212o before it evaporates, this evaporative cooling helps to keep the rest of the cooking chamber operating at a lower temperature. With other methods of heat deflection, the materials will eventually rise to the temperature of the oven you’re cooking in, making it less than ideal for longer cooks at lower temperatures.
Water evens out the temperatures in your smoker:
Another benefit to using water in your smoker is that water serves as a heat sink and evens out the temperatures in your cooking chamber. Try this- (More science!) Place a pan of water right next to a heat source and you’ll find the water temperature is consistently the same across the entire pan. This will help balance out any potential hot spots in your cooker and keep the heat distribution even, especially if you’re cooking indirectly in a kettle style grill or an off-set smoker.
Water also takes longer to rise and fall in temperature than other materials. This means the temperatures in your smoker will be less prone to fluctuation and will be more stable. Temperatures will also normalize quicker, should you need to open the cooker for any reason.
Water helps increase the humidity of your smoker:
Anyone who’s ever set a pot of water on to boil and then forgotten about it has undoubtedly returned to find the pot with a lot less water it in. This is because water evaporates when it reaches its boiling point, releasing water vapor into the air. This water vapor, known as humidity, serves several purposes:
Some of the water vapor condenses onto the meat, helping to cool it down while it cooks. The longer cook time allows for more connective tissue and fats to break down, providing a more tender and moist product.
Some of the water vapor mixes with a chemical in the smoke, which then sticks to the meat and adds even more flavor.
The water vapor helps aid in bark formation- Moisture from the meat and water vapor in smoke dissolves the water soluble ingredients in the rub, such as the salt and sugar. During the cooking process, the meat is constantly drying and re-moisturizing. This action of constant drying and moisturizing builds up the thick, flavorful crust we call bark.
Should I use anything other than water in the pan?
The quick answer is you can, but it’s pointless. There’s a common misconception that if you put beer or fruit juices in your smoker’s water pan, you’ll impart a bit of flavor to your barbecue. This is a false misconception- most of the flavor is going to come from the rub, smoke and any sauce you use. Unless you’re a super-taster, you’re not going to notice any flavor from whatever juice or beer you put in your water pan. The moral to the story: drink your beer.
Drawbacks to using water in your smoker:
Probably the biggest argument against using a water pan is the cleanup; however this doesn’t have to be difficult. You even have a few options:
If you have a little used spot on your property and aren’t worried about attracting critters, then just simply dump the water out and proceed with cleaning your pan.
Pull the water pan out of the smoker and set it aside to cool. The fat from the meat will start to harden and float to the top. You can then skim the fat right off the top and discard it in the trash. The water can then be dumped down the drain, or out in your yard somewhere. CAUTION: Do not dump the water down a drain until you have removed all of the excess fat. Over time this fat can build up and block the sewers.
Use a drip pan under your food to catch the grease. This should leave your water pan relatively fat free, to allow for easier cleanup.
Mix the water with the cooled ashes from your fire pit, and then discard in the trash.
Grab a funnel and dump the water into an old milk jug and then discard in the trash.
You can save a bit of the water and fat from the cook to use in a sauce or roux.
Don’t forget to wrap the pan in foil before
The second biggest complaint against using water in your smoker is because it’s a resource hog. Water takes longer to heat up, so you’ll use a bit more charcoal running water in your smoker than you will with any other form of heat deflection. But if your goal is to cook low and slow for a long period of time, cooking with water will be better for the long run.
Another oft cited complaint is “You have to refill the water-pan.” Sure- every couple hours or so, you might need to add water. For most cooking sessions, you might only need to refill it once, so this really isn’t an issue.
Tl;dr: Drink your beer and cook with water in your pan.
Learning how to BBQ is the gift that keeps on giving. Science has proven that people who BBQ well, and by that I mean people who turn out kick ass food, are more attractive, more fun to be around, and will live longer, healthier lives*. It’s science, and who am I to argue with science? Learning to BBQ is both fun, and rewarding.
Before you can BBQ well, however, there are a few things you need to know first.
BBQ refers to cooking low and slow, and this takes time. If you’re in a rush, or don’t have a whole lot of patience, you may be better off learning to master the grill, or just going out to eat. While there are things you can do to speed up the process, it’s best to plan on cooking over the course of several hours. Beer is perfect for these occasions.
You don’t have to spend a ton of money on a cooker to turn out kick ass BBQ. When I first got started in BBQ, I had no earthly idea what I was doing. I was broke and wanted to do something special for my then significant other’s birthday, so I headed to the local hardware store and bought an ECB (El Cheapo Brinkman) for $50.00. My first cook was a couple of tri-tips, which did not come out as well as I had hoped. My second cook, however, was pulled pork. Several hours of work, and many lessons learned turned out some of the most fantastic pulled pork I have ever had in my life. From there I did ribs, chicken and a full turkey, all in my little $50.00 cooker. The food was a home run every time.
Start with something simple and forgiving while you learn your cooker and technique.My advice for someone new to BBQ is to start with something simple and forgiving, like pork shoulder or pork butt. Pork is forgiving because you can cook it to a wide variety of temperatures and still have something pretty awesome. With something like brisket or ribs, there’s a delicate balance between cooking it just right, and getting something that resembles mush or leather.
Take time to season your cooker properly. Seasoning your cooker helps burn off and seal any impurities from the manufacturing process, plus it also helps protect your smoker from moisture. Seasoning is a pretty simple process: Coat your grill in oil, and run a load of coal through it. The oil will absorb itself into the pores of your cooker and seal them up. For additional sealing, run a pound or three of bacon through your cooker. Or cook something fatty, like pulled pork. The grease and fatty build up will further coat the inside of your cooker, and ultimately will help provide an insulation barrier that will help regulate the temperature better.
Do a mock cook with your smoker. Charcoal and wood chunks don’t cost a lot of money, so you might find it beneficial to do a test cook with your smoker before you cook anything you plan on serving to people. This will give you an opportunity to familiarize yourself with your cooker’s temperature controls, airflow settings, water consumption and burn time, and will help avoid catastrophe when you start cooking actual food.
You don’t need a lot of expensive equipment or tools to get started. You can turn out killer BBQ with just a $15 meat thermometer, a cheap pair of oven mitts and a set of tongs. Sure, the fancy wireless thermometers and air temperature control devices are nice, and no, the built in thermometer isn’t the most accurate, but don’t let your lack of advanced equipment prevent you from getting started. When you come down to it, all you really need is to be close enough in cooking temperature and a way to gauge the progress of your cook.
Dry Rub doesn’t need to be complicated. While it’s great to develop and experiment with all of these complex seasonings and rubs, there’s no reason to over-complicate things when you’re just starting out. In fact, you may find the basic Dalmatian rub of equal parts kosher salt and ground black pepper to be to your liking. Or, if you want to get fancy, the SPOG rub might be well suited to your liking: Equal parts kosher salt, ground black pepper, onion powder and garlic powder. If you’re new to BBQ, keep it somple.
It’s normal for the temperature to stop increasing, and even cool down for a bit, before climbing back up again. One of the most puzzling aspects for me when I first started learning how to BBQ was the concept known as “The stall.” The stall is when your food suddenly stops increasing in internal temperature, and possibly even decreases a bit. This is absolutely normal, and isn’t cause for panic. What happens when the food stalls in temperature is the meat gets to a point where it’s sweating out all of its moisture- Like the human body, this sweating process causes the meat to cool down a bit, which is why you’ll see the temperatures decrease slightly. Once the moisture in the food has evaporated, the temperature will start increasing again, at often at a much faster rate than previously. Of course there are tricks you can use to power through the stall, which we’ll discuss in another article.
There is no one way to do something. Old timers with years of experience will swear their way is the best, but the thing to remember is, there’s no right or wrong way to BBQ. If something isn’t working for you, try something new. Maybe the way you light your coals is causing your cooker to burn too hot, or maybe your food is taking much longer than you anticipated. There are lots of ways to make BBQ work for you, so if something isn’t working for you, feel free to change it up and try something new.
Relax and have fun! While BBQ is considered an art form for some, it’s therapy for others. Ultimately, though, BBQ is fun. The food is almost always amazing, and with enough practice, you will be the toast of your friends and family in no time. BBQ is the perfect reason for a social gathering, so have fun with it! Enjoy your favorite adult cocktail or three, invite some friends over, watch the game, or just relax and read a book. There’s no right way to BBQ, so be sure to enjoy the process.
Obviously this isn’t a comprehensive list, but it’s a good starting point. If you have questions, please feel free to send me an e-mail at backyardpitmasternet@gmail.com. I’ll be more than happy to assist in any way I can.
*OK, so some of this may be made up. My point still stands- BBQ rocks, and so do those who know how to do it well.